
If you own a Drop ALT Keyboard, you’ve probably wondered what you can do with the firmware. I wanted to swap Caps Lock with ESC and that sent me down the QMK rabbit hole.
QMK gives you plenty of room to customize the keyboard, but I found it easier to start with one concrete change.
Here I’ll activate the Leader Key functionality, from preparing the keymap to compiling and uploading the firmware to the keyboard.
Downloading mdloader
mdloader uploads the compiled firmware to the keyboard. Download the latest version from the releases page. I’ll assume we’re doing all the steps in a folder called keyboard:
wget https://github.com/Massdrop/mdloader/releases/download/1.0.7/mdloader-Linux.zip -P ~/apps/keyboard
unzip ~/apps/keyboard/mdloader-Linux.zip
A file named mdloader will be extracted from the zipped file in the folder.
Preparing qmk_firmware
To compile and customize the firmware we’ll use qmk_firmware through Docker. Create a docker-compose.yml in the working folder:
services:
  qmk:
    image: qmkfm/qmk_firmware
    container_name: qmk
    volumes:
      - ./keymap:/qmk_firmware/keyboards/massdrop/alt/keymaps/custom
      - ./build:/qmk_firmware/.build
    command: "make massdrop/alt:custom"
We now need the default Massdrop ALT keymap so we can customize it. I created a repository containing the default file:
mkdir ~/apps/keyboard/keymap
wget https://raw.githubusercontent.com/Fuhrmann/massdrop-alt-default/main/default-keymap.c -O ~/apps/keyboard/keymap/keymap.c
The Rules File
The rules.mk file tells QMK which features to activate when compiling the firmware. For each feature used in keymap.c we need to enable it here first.
Here are the main features available:
| Feature | Description | Docs |
|---|---|---|
AUTO_SHIFT_ENABLE | Press a key to get its value, hold it to get another | autoshift |
AUTOCORRECT_ENABLE | Checks for spelling errors automatically | autocorrect |
CAPS_WORD_ENABLE | Activates an intelligent version of Caps Lock | caps word |
COMBO_ENABLE | Press multiple keys together to execute custom actions | combos |
KEY_LOCK_ENABLE | Keeps a key automatically pressed until the next press | keylock |
KEY_OVERRIDE_ENABLE | Override modifier key behavior when combined with others | key overrides |
SECURE_ENABLE | Locks all key input until a certain combination is entered | secure |
SEND_STRING_ENABLE | Send sequences of characters in custom shortcuts | send string |
TAP_DANCE_ENABLE | Different behaviors for a key when pressing it multiple times quickly | tap dance |
LEADER_ENABLE | Use a specific key to start keystroke combinations that trigger actions | leader key |
Note
All features in
rules.mkaccept only two values:yesorno. For more information, consult the official documentation.
Activating the Leader Key Functionality
The Leader Key (KC_LEAD) lets you designate a key as the leader: press it, then a sequence of keys to execute a specific action.
For example, I wanted quick browser tab shortcuts, so I mapped leader sequences like this:
KC_LEAD + t: reopens the last closed tab
KC_LEAD + n + t: opens a new tab
You press the key mapped to KC_LEAD, then n, then t to open a new tab. All in sequence.
Note
The key that will be used as
KC_LEADis defined in thekeymap.cfile below!
Now create the rules.mk file:
vi ~/apps/keyboard/keymap/rules.mkAnd specify that we want the leader key functionality activated:
LEADER_ENABLE = yesCreating the Configuration File
Some QMK features can be further customized, such as changing the leader key timeout or customizing behaviors of specific keys. We define these in a file called config.h.
Since we’re activating the leader key, we’ll change the timeout for pressing sequences. Create the config.h file:
vi ~/apps/keyboard/keymap/config.hLEADER_TIMEOUT controls how long (in milliseconds) you have to complete a leader key sequence. LEADER_PER_KEY_TIMING resets that timeout after each key press, so you don’t need to rush through longer sequences.
#pragma once

#define LEADER_TIMEOUT 300
#define LEADER_PER_KEY_TIMING
Configuring the Leader Key
To specify the leader key (KC_LEAD) we need to edit the ~/apps/keyboard/keymap/keymap.c file that we downloaded at the beginning of the article. When opening this file you’ll see the keyboard layout defined like this:
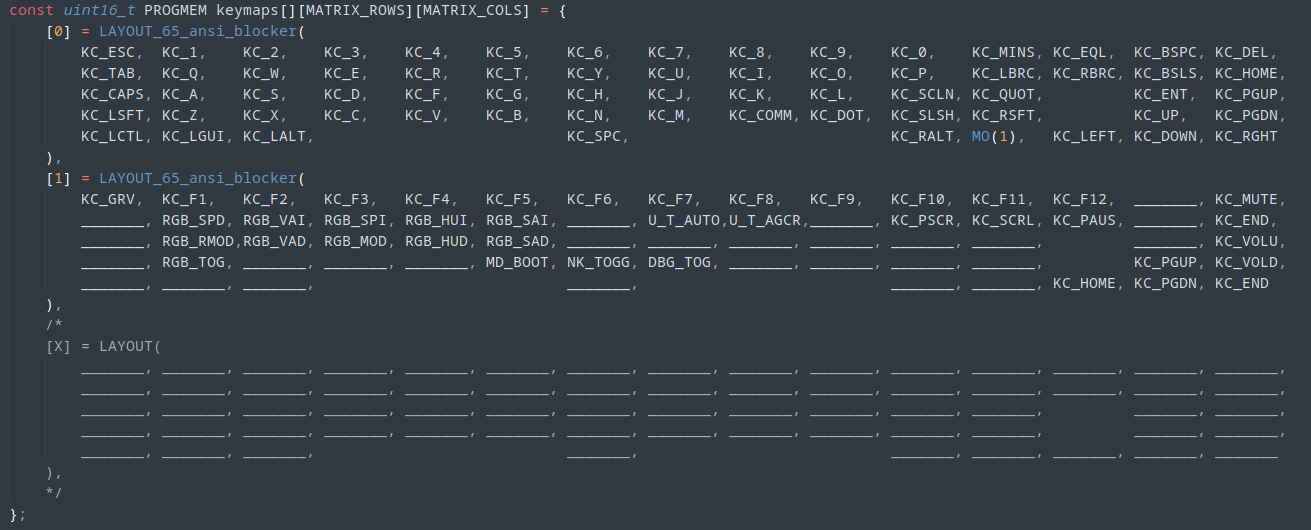
Each row of keys on your keyboard is represented by a row in the layout, and each column respectively.
There are three layers: the first (0) is your default key layer. The second (1) is only activated by pressing a specific key, represented by the keycode MO(1). The third layer (X) is disabled.
In the first layer, choose one of the keys to represent your KC_LEAD key. I chose Caps Lock:

Specifying the Behavior
Still in keymap.c, add a new function at the end of the file that handles keys pressed after KC_LEAD.
SEQ_ONE_KEY(KC_T) matches pressing KC_LEAD then t, and sends Ctrl+Shift+t (reopen last tab). SEQ_TWO_KEYS(KC_N, KC_T) matches KC_LEAD then n then t, and sends Ctrl+t (new tab).
LEADER_EXTERNS();

void matrix_scan_user(void) {
  LEADER_DICTIONARY() {
    leading = false;
    leader_end();

    SEQ_ONE_KEY(KC_T) {
      SEND_STRING(SS_LCTRL(SS_LSFT("t")));
    }

    SEQ_TWO_KEYS(KC_N, KC_T) {
      SEND_STRING(SS_LCTRL("t"));
    }
  }
}
With the function created we’re ready to compile and flash.
Compiling and Sending the Firmware
Compilation is simple:
docker compose run --rm qmkIf everything went well you’ll see this at the end:
QMK Firmware 0.13.26
Making massdrop/alt with keymap custom
..
..
..
..
Copying massdrop_alt_custom.bin to qmk_firmware folder                                              [OK]
(Firmware size check does not yet support cortex-m4 microprocessors; skipping.)
After compiling, we need to send the firmware to the keyboard using mdloader:
Watch out
The keyboard will be unresponsive during the flash process. Don’t unplug it or interrupt the upload.
- Run
./mdloader --first --download build/massdrop_alt_custom.hex --restart - Press
Fn + bfor half a second to restart the keyboard in bootloader mode (this key isMD_BOOTon layer 1 inkeymap.c) - Wait for the keyboard to restart. The LEDs should light up and the new firmware should be running.
Expected output:
./mdloader --first --download build/massdrop_alt_custom.hex --restart
Massdrop Loader 1.07

Massdrop Loader  Copyright (C) 2018-2022 Massdrop Inc.
This program is Free Software and has ABSOLUTELY NO WARRANTY

Scanning for device for 60 seconds
.........
Device port: /dev/ttyACM0 (SAMD51J18A)

Opening port '/dev/ttyACM0'... Success!
Found MCU: SAMD51J18A
Bootloader version: v2.18Sep  4 2018 16:48:28
Applet Version: 1
Writing firmware... Complete!
Booting device... Success!
Closing port... Success!
Now test your leader key sequences:
KC_LEAD + t: reopens the last closed tab
KC_LEAD + n + t: opens a new tab in the browser
The Makefile
I use a Makefile to avoid memorizing commands:
compile:
	docker compose run --rm qmk

flash:
	./mdloader --first --download .build/massdrop_alt_custom.hex --restart
With this file, the workflow becomes:
- Edit
keymap.c make compilemake flash- Press
Fn + bto restart in bootloader - Use the keyboard with the new firmware
Troubleshooting
mdloader doesn’t recognize the keyboard
- Make sure you’ve pressed
Fn + bto restart the keyboard in bootloader mode for at least half a second. You can check which key triggers bootloader mode inkeymap.c, represented by the keycodeMD_BOOT. - You may need to add your user to the
dialoutgroup to access the device port.
Useful Links and Recommended Reading
Source repository for the keymap used here
The Leader Key: A New Kind of Modifier
Comments